Business Card Resume Pro Theme Documentation

File Structure

The template bundle that you downloaded is divided into various directories. Let's examine the contents of each folder.:

  • Screenshots -contains template screenshot. Not for production.
  • theme -contains wordpress theme files
  • "Business Card Resume Pro" -this folder contains all the necessary files for the theme.
  • "license.txt" -contains license details
  • "readme.txt" -contain information about theme images path, font use and usage script

Template Installation

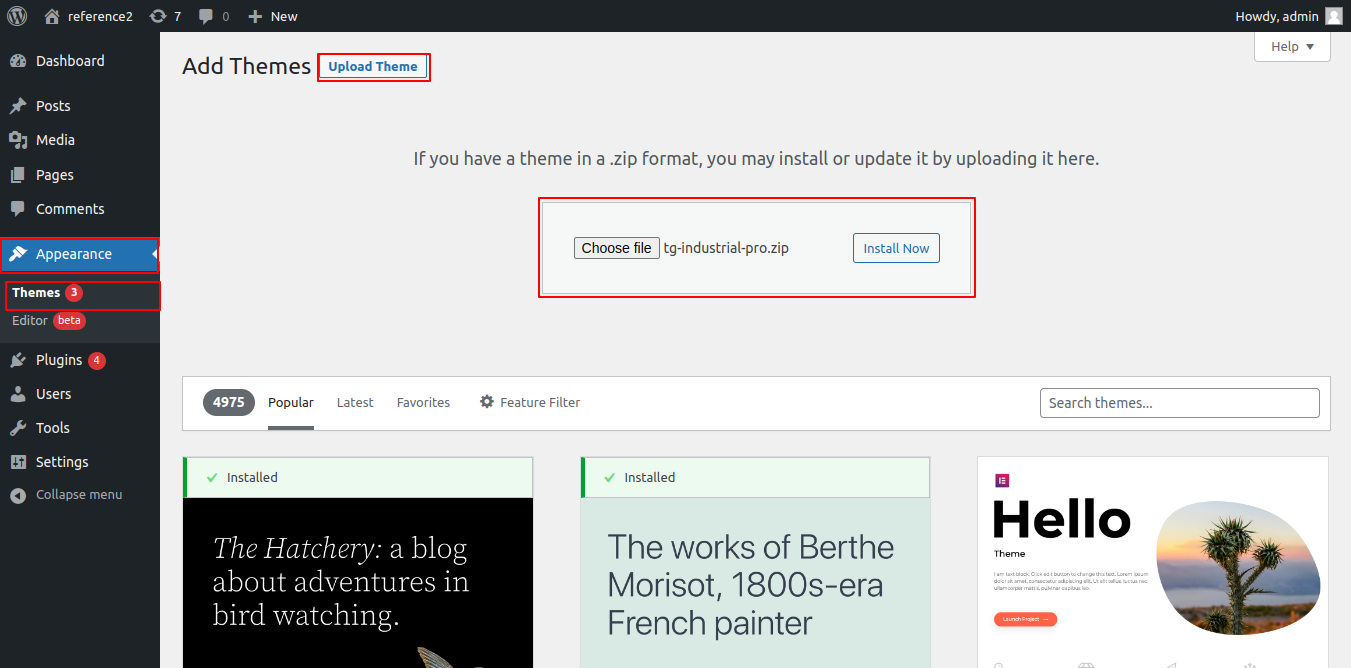
Installing a template is a simple process. There are two ways to complete the installation process.

1-Using WordPress admin, install a theme.

The first step is to log in to your WordPress admin dashboard. then click on

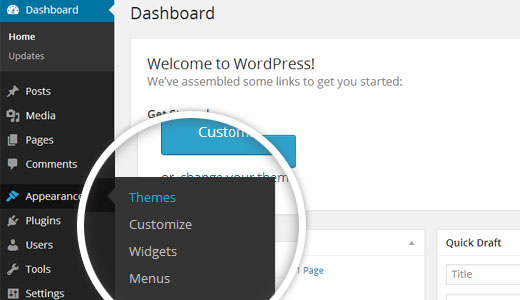
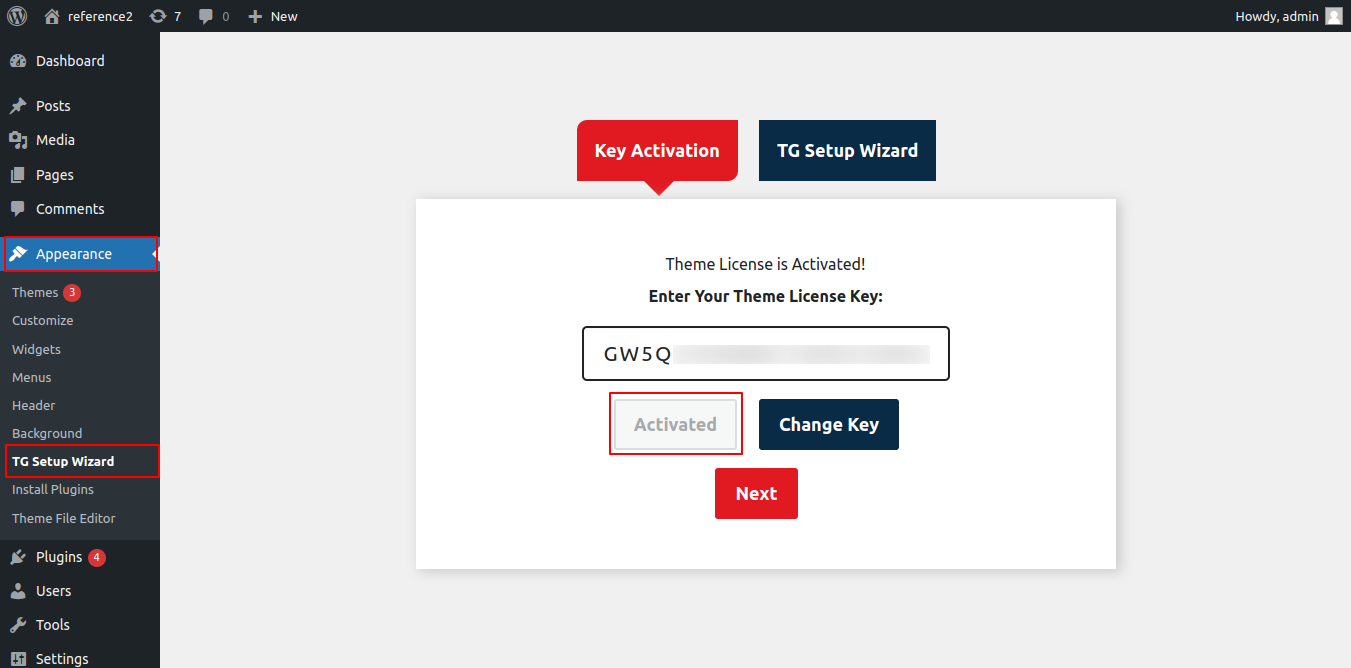
1.Go to the menu Appearance >> Themes


2. Once you're on the themes page, select Add New from the top menu.


3. To upload a theme, click the button.


4. Choose the business-card-resume-pro.zip theme by clicking the Browse button, and then hit the Install Now button.


You've successfully installed your theme, congrats!

TG KEY ACTIVATION

The steps for activating a TG Key are as follows.

Use the License Key that you get through Email to Activate License.

Implement the following procedure to Activate License.

Go to Dashboard >> Appearance >> TG Key Activation >> Enter Key>>Activate.

After Entering The Key >> Activate Licence.

Section Color/Font Pallette

The method of changing the colour or font is quite simple. These choices are available in all customizer areas. It is a comprehensive graphic that demonstrates the typeface and colour palette. You can change the colour and font of the headings, paragraphs, and buttons with a single click.

Depending on the number of options accessible in each area, there is an option to change the colour scheme for the headings, title/text, paragraphs, button text, and button background.

Default Color/Font settings

Fetch Demo content

This theme supports the standard Site Identity area that WordPress provides, and we have added some options to this section.

Follow these instructions to setup Home page.

  • To set a template for a new page, navigate to the Dashboard, click on Pages, and then select Add New Page. Give the page a name, such as "Home," or any other desired label. Next, choose the "home-page" template from the dropdown menu of available templates.


  • 2. Set the front page: Go to Setting -> Reading --> Set the front page display static page to home


  • When you're finished, you can view the entire demo on the top page.

How to set up Home Page

Setup Site Identity

So as to continue with Site Identity ,

Go to Appearance >> Customize >> Site Identity


Setup Header

So as to continue with Header section,

Go to Appearance >> Customize >> Theme Settings >> Header section


Follow these instructions to setup Header section

  • Do you want this section: Includes options to show or hide the header search
  • Header Background Color: You can add a background color here, and your site will display it when you do.
  • Add Menu Color: You can add a menu colour here, and your website will display it.
  • Add Menu Item Fonts: The Menu Item Fonts that you add here will be seen in the header section of your website.

Setup Main Banner


Setup for the Main Banner is as simple as the steps below.

Go to Appearance >> Customize >> Theme Settings >> Main Banner Settings


  • Setting Options : Contains options for the Service display enable/disable option. With this setting, you can enable/disable this section. This environment is really significant. If you want this section to display on your website, leave the option enabled. If you don't want it to appear on your website, choose the disable option, and the section will be removed.
  • Number of Main Banner To Show: Let you to choose how many Main Banners to display.
  • Main Banner Image: Here you can set the images for Main Banner.
  • Main Banner Heading Title: You can choose here how the title will appear on the main banner.
  • Main Banner Text: It allows you to set the text to be displayed on silder image
  • Main Banner Heading Color: Allow setting the Main Banner's heading colour.
  • Main Banner Heading Fonts: With this option, you may change the font used for the Main Banner header.
  • Main Banner Text Color:You can choose the color of the text in the Main Banner with this option.
  • Main Banner Text Fonts: With this option, you may change the Main Banner heading's font.
  • Button Text Fonts: With this option, you may change the typeface used for button text.

Setup About Us Section

So as to continue with About Us Section,

Go to Appearance >> Customize >> Theme Settings >> About Us Section


Follow these instructions to setup Our About Us Section

  • Do you want this section: Includes settings for About Us Section display enable / disable option.
  • Add Background Color: You can add Background Color here and the Background Color will be displayed of your site.
  • Add Background image: You can add Background image here and the Background image will be displayed of your site.
  • Add Main Heading: You can add Main Heading will be displayed in About Us Section of your site.
  • Add About Us Image: You can add About Us Image here and the About Us Image will be displayed of your site.
  • Add About Us Details Title: You can add Services Us Details Title here and the About Us Section Title will be displayed of your site.

Setup My Specialization Section


So as to continue with My Specialization Section,

Go to Deshboard >>Appearance >>Customize >> Theme Settings >>My Specialization Section


  • Setting Options: Includes settings for My Specialization display enable / disable option.
  • Add Background Color: You can add a background colour here, and your site will display it when you do.
  • Add Background image: You can upload a background image here, and it will appear on your website.
  • Add Main Heading : Here, you may enter a Main Heading that will appear on your website's My Specialization section.
  • How We Work Text Here, you can enter text that will be displayed in My Specialization under "How We Work."
  • No of Phases: Add the number of phases here.


Setup Skills Showcase Section


So as to continue with Skills Showcase Section,

Go to Appearance >>Customize >> Theme Settings >> Project Section


Follow these instructions to setup Skills Showcase Section.


  • Setting Options: Includes options to activate or disable the display of the What Do We Do sections.
  • Add Background Color: You can add a background color here, and your site will display it when you do.
  • Add Background image:You can upload a background image here, and your site will display it.
  • Main Heading: You can add a main heading here, and it will appear in the website's "What We Do" section.


Setup Portfolio Section

So as to continue with Portfolio


Go to Deshboard -> Project -> Add New


1. Go toAppearance -> Customize -> Theme Settings -> Portfolio Section


Follow these instructions to setup Portfolio Section Section.


  • Setting Options: Includes options to enable or disable Portfolio display.
  • Add Background Color: You can add a background colour here, and your site will display it when you do.
  • Add Background image: You can upload a background image here, and your site will display it.
  • Main Heading: You can add a main heading here, and it will appear in your website's portfolio section.
  • Key Fact Icon : You can add an Important Fact Icon here, and your site's Portfolio Section will display it.
  • Key Fact Title : You can put a key fact title here, and your site's portfolio section will display a key fact icon.


Setup Education & Experience Section


Deshboard-> Appearance -> Customize -> Theme Settings -> Education & Experience Section


So as to continue with Education & Experience Section

  • Setting Options: Includes settings for Why Chooses Us display enable / disable option.
  • Background Color: It allows you to set the background color of this section.
  • Background Image: In this section, you have the option of setting a background image.
  • Section Title: You may customise the title of this section using this option. As seen in the screenshot up top, the title of the Education & Experience Section is settable using this option.

Setup Awards & Certificates Section


So as to continue with Our Awards & Certificates Section

Go to Deshboard ->Appearance -> Customize -> Theme Settings -> Our Awards & Certificates Section


  • Setting Options: Includes settings for Our Awards & Certificates Section display enable / disable option.
  • Background Color: It allows you to set the background color of this section.
  • Background Image: In this section, you have the option of setting a background image.
  • Main Heading: You may choose the Primary Heading for this section using this option. As shown in the screenshot above, you can also use this option to specify the Primary Heading.

Setup Testimonials Section


Go to Dashboard -> Testimonials -> Add New


Deshboard -> Apperance -> Theme Setting -> Testimonials


  • Setting Options: Includes settings for Core Services display enable / disable option.
  • Background Color: It allows you to set the background color of this section.
  • Background Image: It allows you to set background image in this section.
  • Main Heading: You may choose the Primary Heading for this section using this option. As shown in the screenshot above, you can also use this option to specify the Primary Heading.

Setup Amazing Clients Section


In order to setup the following section go to Appearance -> Customize -> Theme Settings -> Amazing Clients Section


  • Setting Options: Includes settings for Amazing Clients Section display enable / disable option.
  • Background Color: It allows you to set the background color of this section.
  • Background Image: It allows you to set background image in this section.
  • Main Heading: This option allows you to set the Main Heading of this section. As you can see in screenshot above, likewise you can set the Main Heading with the help of this option.


Setup Articles Section


Go to Deshboard-> Post ->Add New


Go to Appearance -> Customize -> Theme Settings -> Location Section


So as to continue with Articles Section

  • Setting Options: Includes settings for Our Commitment Section display enable / disable option.
  • Background Color: It allows you to set the background color of this section.
  • Background Image: It allows you to set background image in this section.
  • Main Heading: This option allows you to set the Main Heading of this section. As you can see in screenshot above, likewise you can set the Main Heading with the help of this option.


Setup Hobbies Section


So as to continue with Hobbies Section,

Go to Appearance -> Customize -> Theme Settings -> Hobbies Section


Follow these instructions to setup Hobbies Section.

  • Setting Options: Includes settings for Hobbies Section display enable / disable option.
  • Background Color: It allows you to set the background color of this section.
  • Background Image: It allows you to set background image in this section.
  • Main Heading: This option allows you to set the Main Heading of this section. As you can see in screenshot above, likewise you can set the Main Heading with the help of this option.


Setup Contact Section


Go to Deshboard-> Contact ->Add New


Go to Appearance -> Customize -> Theme Settings -> Contact


So as to continue with Articles Section

  • Setting Options: Includes settings for Our Commitment Section display enable / disable option.
  • Background Color: It allows you to set the background color of this section.
  • Background Image: It allows you to set background image in this section.
  • Main Heading: This option allows you to set the Main Heading of this section. As you can see in screenshot above, likewise you can set the Main Heading with the help of this option.


Setup Footer Section


So as to continue with Footer,

Go to dashboard -> Widgets


Follow these instructions to setup Footer Section.

  • Do you want this section: This section allows you to enable/disable this section altogether. In case, if you don't want this section on your site, just click on disable option and this section will disappear from your site. And if you want this wonderful section to appear on your site, just be it enabled and it will appear on your site.
  • Footer Heading Color: Here, you can set the Footer Heading Color of footer
  • Footer Heading Fonts: Here, you can set the Footer Heading Fonts of footer.
  • Footer Content Color: Here, you can set the Footer Content Color of footer.
  • Footer Content Fonts: Here, you can set the Footer Content Fonts of footer.
  • Background Color: Here, you can set the Background Color of footer if you want.
  • Background image: Here, you can set the Background Image of footer if you want.

Setup Footer Text

So as to continue with Footer Text,

Go to Deshboard >> Appearance >> Customize >> Theme Settings >>Footer Text


Follow these instructions to setup Footer Text Section.

  • Content Color: Here, you can set the Content Color of footer
  • Content Fonts: Here, you can set the Content Fonts of footer.

Setup Inner Pages

404 Page Settings


Go toDashboard -> Apperance -> Themes ->Customize ->Theme Setting ->404 Page Setting


Setup Page With No Sidebar


Go to Deshboard -> Pages -> add new


Setup Page With Left Sidebar


Go to Deshboard -> Pages -> add new


Setup Page With Right Sidebar


Go to Deshboard -> Pages -> add new


Setup Page With Left Right Sidebar


Go to Deshboard -> Pages -> add new


Setup Blog With No sidebar


Go to Deshboard -> Pages -> add new


Setup Blog With Left sidebar


Go to Deshboard -> Pages -> add new


Setup Blog With Right sidebar


Go to Deshboard -> Pages -> add new


Plugins

Plugins are ways to extend and add to the functionality that already exists in WordPress.
How to activate plugins

If you want these functionalities in your theme for which you need to activate plugin. Follow these instructions to activate plugin in your theme.

Go to Plugins >> Installed Plugins >>medical-doctor-pro-posttype>>Activate


When you activate plugin, you can see four more options in your admin navigation, i.e Services , Projects , team ,Customers. You can see this four options in the admin navigation of the image because the plugin is activated.

These four sections automatically appears in your website once you activate plugin. You can see scrennshot of the same below.

Now, you can see these sections are added but contents are not there. For adding contents to these sections, follow these instructions.

First activate "medical-doctor-pro-posttype" plugin. Then only you add Testimonials

To add testimonials., Go to testimonials. >> Add new


With testimonial Meta option that you can see in the screenshot, you can add Logo and their URL to these section which gets uploaded automatically in Our testimonials. according to the Our testimonials images you add.

You can Also add Comments with Allow Comment option.

Now, you can add title of Our testimonials. and description as shown in image above


In this way, you can set up Our Project.


Page Templates and sidebars

Page Templates

  • Default Template (the default page template with a right sidebar position)
  • Page (Left Sidebar) (a page templates with left sidebar position)
  • Page (Right Sidebar) (a page template with right sidebar position)
  • Blog (Full Width) (a blog templates with one column without sidebar)
  • Blog (Left Sidebar) (a blog templates with left sidebar position)
  • Blog (Right Sidebar) (a blog template with right sidebar position)
  • Contact (the default Contact template with no sidebar position)
  • Home Page (the default home page template with right sidebar position)

Post, Categories and Post Formats


Adding category

Review the following article for more information on adding categories: http://codex.wordpress.org/Manage_Categories_SubPanel

  1. Log into your WordPress Administration Panel (Dashboard).
  2. Click the Posts tab.
  3. With that done, click Categories for blog posts.
  4. Type in the name of your new category.
  5. After that, click the Add New Category button.
Click the Publish button.

Creating a Blog post

  1. Log into your WordPress Administration Panel (Dashboard).
  2. Click the Posts tab.
  3. Click the Add New tab.
  4. Type in your post content. For more information on adding posts, please check the following link http://codex.wordpress.org/Posts_Add_New_SubPanel.

Shortcodes

A shortcode is a powerful content building tool http://codex.wordpress.org/Shortcode. Shortcodes are easy to use. First of all, make sure that the editing mode is set to Visual.


Check the list of shortcodes that are available with the Themes:

  • [list-core-services]
  • [list-working-process]
  • [our-commintment]
  • [medical-doctor-pro-team]]
  • [medical-doctor-pro-testimonials]
  • [medical-doctor-pro-specialist]
  • [medical-doctor-pro-specialist-slider]

Widgets