Hospital Pro wordpress theme Documentation

Introduction

You're welcome for purchasing our WordPress theme. This documentation's several sections each demonstrate how to set up and administer a WordPress website from scratch.

What is WordPress CMS?

WordPress is an open source website creation tool that uses PHP and MySQL as its foundation. It is a robust blogging platform and a totally free content management system (CMS). Using this CMS, you may create reliable online applications and websites. To manage it, you scarcely need any technological expertise or understanding. Because of its many benefits, including ease of use and flexibility, WordPress has emerged as the most popular website construction tool on the market.Learn More

What is a WordPress template

A WordPress template serves as the skin for websites built using the WordPress content management system. A WordPress template is incredibly simple to setup. You may quickly modify the appearance of your WordPress website by installing a new template. A WordPress template comes with all the necessary source files, and you are free to change and expand it however you see fit.

File Structure

The template bundle that you downloaded is divided into various directories. Let's examine the contents of each folder:

  • Screenshots -contains template screenshot. Not for production.
  • theme -includes WordPress theme files
  • "alt-hospital-pro.zip:" -this folder content all the necessary files for the theme.
  • "license.txt" -contains licence information
  • "readme.txt" -contain information on the theme's image path, font usage, and script usage
  • My site was working fine before? Who changed the File Permissions?

    WordPress may be unable to create directories, upload photos, or execute some scripts if file permissions are set incorrectly.

    To manage files and create directories on the server, WordPress needs permissions.

    • Then, choose "File Permissions" from the context menu when you right-click on all of the folders in the root directory.
    • wp-config >> permissions dialog box >> click on checkbox read and write >> Click on the OK button to continue
    • Repeat the same procedure with the wp-content folder

Template Installation

Installing a template is a simple process. There are two ways to complete the installation process.

Step 1. Theme Installation

Logging into your WordPress admin area is the first step you need to take. then click on

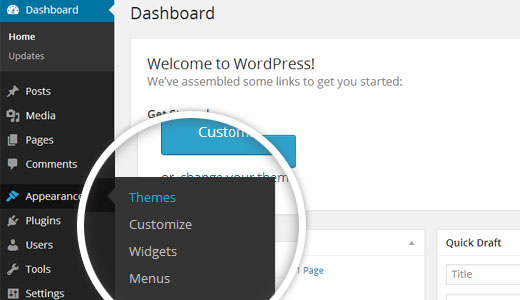
Go to the menu Appearance Themes

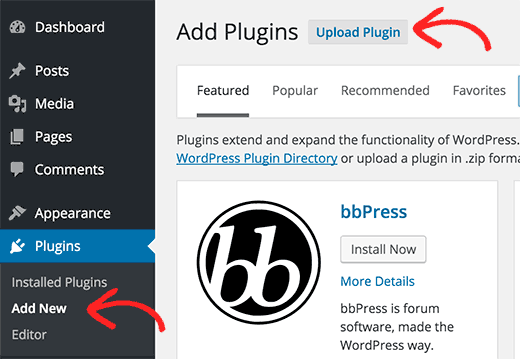
When arriving at the themes page, select the Add New button at the top.

Click on upload theme button.

Click on Browse Button then choose your alternative affiliate marketing pro theme and click Install Now Button..

Your theme will now be installed by WordPress, and you will see a success message with a link to activate it or view a live preview.

Step 2. Install a Theme using FTP

The theme can be uploaded using FTP, which is your second installation option. To use this method, first log into your website using FTP and navigate to the wp-content/themes folder. Just extract the Total folder from the theme file you got and upload it to your server.

Once you've logged in to your WordPress website, go to Appearance Themes to activate total folder.

Plugin Installation

With plugins, you can increase and expand the functionality of WordPress.

How to turn on plug-ins If you want these features in your theme, you must activate the plugin. In order to activate the plugin in your theme, follow these instructions.

To manually install a WordPress plugin using a.zip archive, follow the instructions below for uploading the plugin.

Install Required Plugins:

Alt Affiliate Marketing Pro Posttype plugin, Contact Form 7

You must install and activate the Alt Affiliate Marketing Pro Posttype plugin before you can use affiliate marketing since without it, your site's content cannot be shown.

1.Add Plugin : Go to Dashboard Add New Upload plugin..

click on the install now button and activate.

One-Click Demo Content Importer

To set up your theme, simply click to import sample content. You can follow the instructions in this article to develop your website for website creation.

Go toDashboard >> Appearance >> Get started

Click on"Demo Content Importer" and then "Run Importer".

Section Ordering

How to Arrange and Reordering Section

To reorder a part simply means to arrange it according to our needs. Drag the segment to the top or bottom as necessary to continue with this section. Your front view will change in accordance with customizer options when you drag any portion to the top or bottom.

You can reorder sections by simply dragging and dropping the options into the desired order.

So as to continue with Section Ordering.

Step 1 Go to Dashboard >> Appearance >> Customizing >> Plugin Setting >> Section Ordering

Click on "Demo Content Importer" and then "Run Importer".

How to set up homepage

The index page with the most recent post will be visible when you access your site after activating the theme. You must now configure the home page design such that it displays the entire demo area on your front page.


Setup Home Page

Use these guidelines to set up your home page.

1. Create Page to set template : Go to Dashboard Pages Add New Page.

Select the template.

2. Set the front page: Go to Setting Reading Set the home page as the front page display static page..

When you're finished, you can view the entire demo on the top page.

Setup Topbar

To proceed with the Topbar Section.

Topbar

Go to Appearance Customize Theme Setting Topbar .


Setup the Topbar section in this manner.

Site Identity

Follow the steps below to proceed with Site Identity.

Site Identity

Go to Appearance Customize Site Identity .


Setup Header

Follow the steps below to configure the Header.

Go to Dashboard Pages Add New

For menus, you must first create a menu and then add menus from the Add menu items menu.

Go to Appearance Customize Theme Settings Header .


If you want to add more pages, follow the same procedure.

This is how you add the Header section.


Setup Social Icons

In order to continue with Social Icons,

To further configure this section, see the screenshots below.

Go to Appearance Customize Theme Settings Social Icons.

This is how you set up Social Icons.


Setup Slider

To continue with the slider.

Go to Appearance Customize Theme Settings Slider Section.


This is how you add the slider section.


Setup Tabs Content

To proceed, navigate to the Tabs Content Section.

Go to Appearance Customize Theme Setting Tabs Content .


This is how you configure the Tabs Content section.

Setup About Us

To proceed with the About Us section.

To further configure this section, see the screenshots below.

Go to Appearance Customize Theme Settings About Us.


This way, you can configure What We Do


Setup Services Offered

To proceed with the Services Offered.

To further configure this section, see the screenshots below.

Go to Appearance Customize Theme Settings Services Offered.


This is how you set up Services Offered.


Setup Our Services

In order to continue with Our Services.

To further configure this section, see the screenshots below.

Go to Appearance Customize Theme Settings Our Services.


In this way you can setup Our Services


Setup Our Product Section

Follow these instructions to Setup Our Product Section.

First you need to upload and activate the Woocommerce plugin.

After installation Product section option will appear on the dashboard.

Go to Dashboard Products Categories.

Go to Dashboard Products Add New .

Go to Appearance Customize Theme Settings Our Product Section .

This is how you set up the Our Products section.


Setup Our Gallery

To set up Our Gallery, follow these steps.

To further configure this section, see the screenshots below.

Go to Appearance Customize Theme Settings Our Gallery .


You can configure Our Gallery Sections in this manner.


Setup What Our Client Says Section

To continue with What Our Client Says.

To further configure this section, see the screenshots below., First you need upload and activate Hospital Pro Posttype plugin.

Follow these steps after the Testimonials option appears on the dashboard after installation.

Go to Dashboard Testimonials Add New .

Go to Appearance Customize Theme Settings What Our Client Says.


This is how you set up the What Our Client Says section.


Setup Hospital Facility Section

To proceed with the Hospital Facility.

To further configure this section, see the screenshots below.

Go to Appearance Customize Theme Settings Hospital Facility.


This is how you set up the Hospital Facility Section./p>


Setup Latest News And Events Section

To proceed to the Latest News And Events section,

To further configure this section, see the screenshots below., First you need upload and activate Hospital Pro Posttype plugin.

Go to Dashboard Posts Categories.

Go to Dashboard Posts Add New .

Go to Appearance Customize Theme Settings Latest News And Events .


In this way you can setup Latest News And Events section.


Setup Tips And Department

To continue with Tips And Department.

To further configure this section, see the screenshots below.

Go to Appearance Customize Theme Settings Tips And Department.


You can set up Tips And Department in this manner.


Setup About Hospital Section

To proceed with the About Hospital Section.

To further configure this section, see the screenshots below.

Go to Appearance Customize Theme Settings About Hospital.


This is how you can set up the About Hospital Section.

Setup Contact Page

To set up the Contact Page, you must first upload and activate the Contact Form 7 plugin.

Go to Dashboard Contact Add New .


Go to Dashboard Pages Add New .


Go to Appearance Customize Theme Settings Contact.


Contact Page will be appear on page like this

Setup Sidebar Settings

To further configure this section, see the screenshots below., First you need upload and activate Hospital Pro Posttype plugin.

Go to Dashboard Posts Add New.

Go to Appearance Customize Theme Settings Sidebar Settings.

This is how you set up the Sidebar Settings Section.


Setup Footer Widgets Section

To get started with Footer Widgets,

To further configure this section, see the screenshots below., First you need upload and activate Hospital Pro Posttype plugin.

There are four columns in the Footer Widgets. Each column have different element to show. These sections will be setup from the admin pannel widget section. Add whatever widget you want and you can update the widget.

Dashboard >> Appearance >> Widgets.

Go to Appearance Customize Theme Settings Footer Widgets. .

Footer will be Appear on page like this.


Footer Text

Setup For Footer Text

To proceed with the Footer Text section.

Go to Appearance Customize Theme Settings Footer Text..

Copyright text should be selected in the footer text section.

The text section in the footer will be This will appear on the page.


Setup Our FAQ Section

To further configure this section, see the screenshots below.

Go to Appearance Customize Theme Settings Our FAQ.

This is how you can set up Our FAQ Section.

Themes Plugin

  • The functionality that already exists in WordPress can be expanded and enhanced via plugins.

    If you want these features in your theme, you must activate the plugin. In order to activate the plugin in your theme, follow these instructions.

    How to activate plugins

    Go to Plugins Installed Plugins photography-pro-Posttype. Activate


Page Templates and sidebars

Page Templates

  • Default Template (the standard page layout with the right sidebar )
  • Home Page Template(Front page with the demo content)
  • Blog Full Width Extend (Page template with no sidebar position)
  • Blog with Left Sidebar (A page templates with left sidebar position)

  • Blog With Right Sidebar (A page template with right sidebar position)

  • Page with Left Sidebar (A page templates with left sidebar position)

  • Page With Right Sidebar (A page template with right sidebar position)

  • Contact Template (The default Contact template with no sidebar position)

Post, Categories and Post Formats


Adding category

For additional details on adding categories, see the article below:click here

  • Log in to your WordPress Administration Panel (Dashboard).

  • Click the Posts tab.

  • With that done, click Categories for blog posts.

  • Enter the name of your new category here.

  • After that, click the Add New Category button.

Simply press the Publish button.

Creating a Blog post

  • Log in to your WordPress Administration Panel (Dashboard).

  • Click the Posts tab.

  • Click the Add New tab.

  • Enter the text for your post. Please click the following link for further details on adding posts.click here


Shortcodes

A shortcode is an effective tool for creating content click here Using shortcodes is simple. Make sure the editing mode is first set toVisual.

Testimonials

Available shortcodes are

>Testimonials-[alt-affiliate-marketing-pro-testimonials]


CUSTOM WIDGETS

So as to continue with Widgets Section,

Go to Appearance Customize Theme Settings Footer Widgets.

This is how you can setup Final Footer section.

How to Setup Additional Theme AddOns

1.The plugin must first be downloaded from the source (which will be a zip file) ( Post Type plugin.zip). Then, click the Plugins » Add New page in the WordPress admin area.

2.After that, click the Upload Plugin icon at the page's top.

3.You'll arrive at the plugin upload page after doing this. Next, you must select the plugin file you already downloaded to your computer by clicking the choose file option.

4.After choosing the file, you must select the install now option.

5.The plugin file from your computer will now be uploaded to WordPress, where it will be installed. After installation is complete, a notice like this will appear.

6.To use the plugin after installation, click the link that says "Activate Plugin"