The template bundle that you downloaded is divided into various directories. Let's examine the contents of each folder:
Screenshots
-contains template screenshot. Not for use in production.
theme
-includes WordPress theme files
"wp-fitness-pro-1.0.zip and wp-fitness-pro-child-1.0.zip"
-This folder contains all of the files required for the theme.
"license.txt"
-contains licence information
"readme.txt"
-contain information on the theme's image path, font usage, and script usage
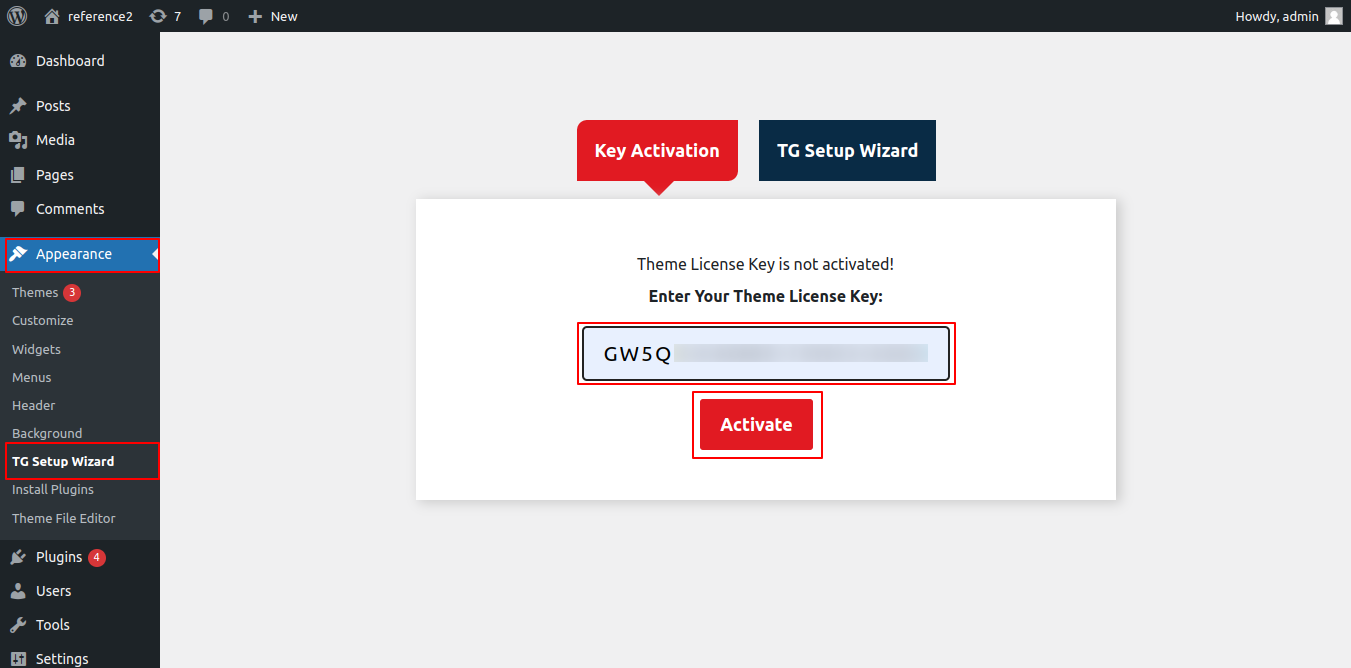
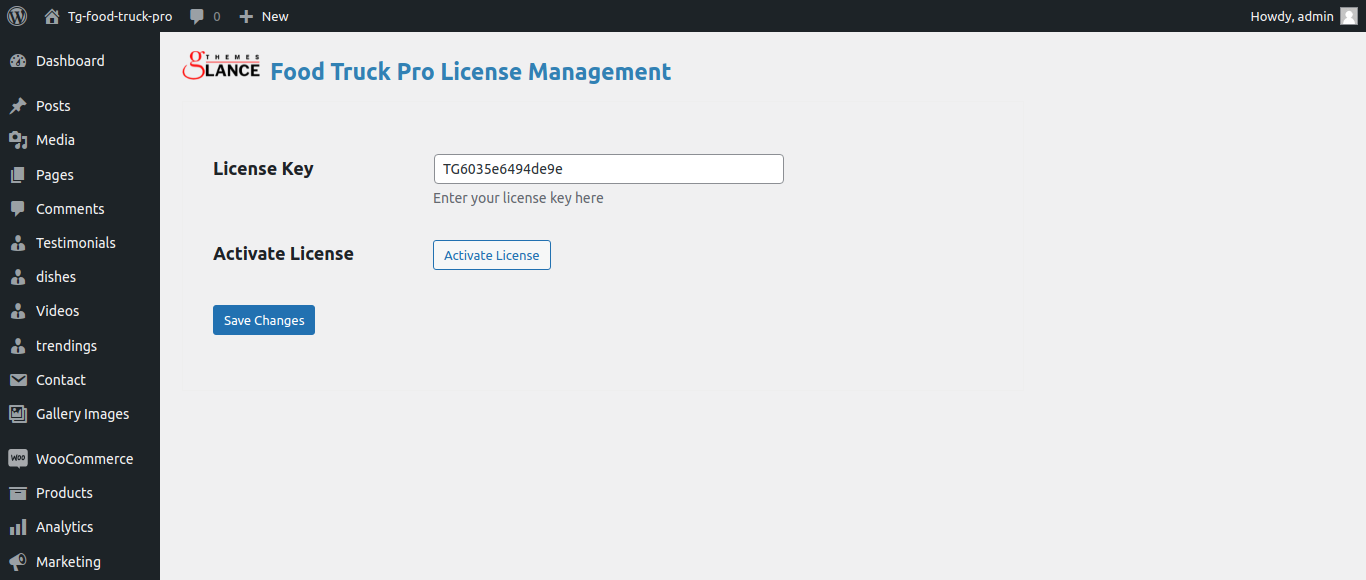
TG KEY ACTIVATION
The TG Key Activation procedure is as follows.
As you will get the License Key on your Email, use that key to Activate License.
Follow the following Process to Activate License.
Go to Dashboard >> Appearance >> TG Key Activation >> Enter Key>>Save Changes.
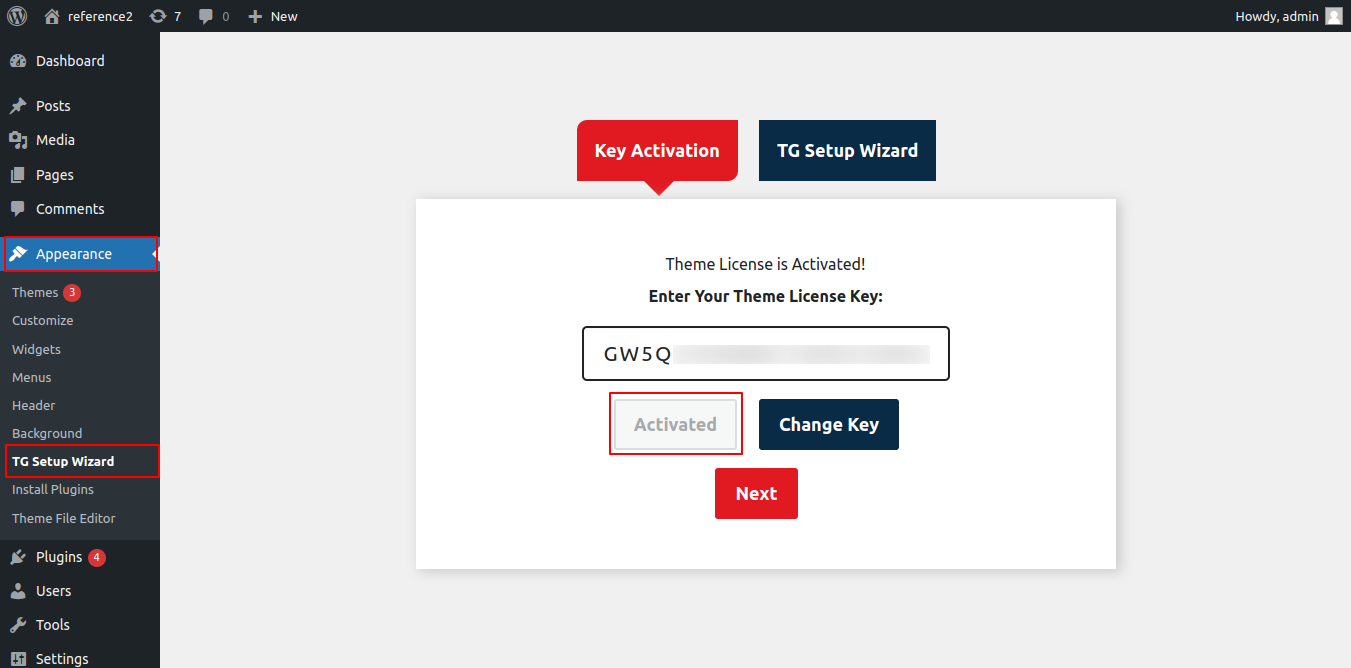
After Entering The Key >> Activate Licence.
After you Activate Licence,the key will be active and then you can Getstarted with the Theme.
In this way you can activate your Licence Key.
Template Installation
The process of installing a template is very straight forward and easy. The installation process can be done in two ways
1-Install a theme using wordpress admin
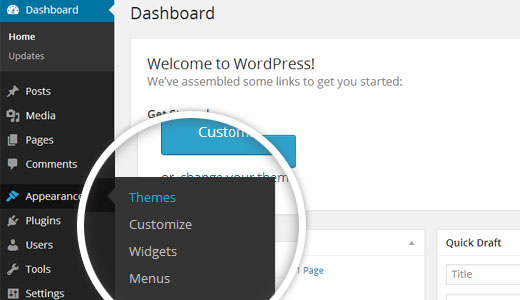
The first step is to log into your WordPress admin area. Then, click on
1.Go to the menu
Appearance >> Themes
2. Once you've arrived at the themes page, click the
Add Newbutton at the top.
3. Select the Upload Theme button.
4. Click on Browse Button then select your wp-fitness-pro-child-1.0.zip theme and click on install now button.
5. WordPress will now install your theme and provide a success message with a link to activate it or view a live preview.
Congratulations, your theme has been installed successfully.
Section Color/Font Pallette
Color/font selection is a simple process. These choices are available in all parts of the customizer. It is a complete graphic that demonstrates the colour and font palette. You can change the colour and typefaces of the headings, paragraphs, and buttons with a single click.
Depending on the number of options accessible in that area, each individual section has the opportunity to change the colour palette for Headings,Title/Text,Paragraph,Button Text, and Button Background.
Default Color/Font settings
Fetch Demo content
This theme supports WordPress's default Site Identity section, and we've included some customization options in this section.
Follow these steps to create your home page.
1. Create Page to set template: Go to Dashboard >> Pages >> Add New Page.
Label it "home" or whatever you like. Then, from the template menu, select "home-page."
2. Set the front page: Go to Setting >> Reading >> Set the front page display static page to home page
When you're finished, you'll be able to see all of the demo content on the top page.
Typography Settings
Color/Fonts Setting is a simple technique for changing or setting the site's colour/fonts.
Go to
Appearance > Customize > TG Settings > Typography Settings
This section includes the following options:
Headings (h1, h2, h3, h4, h5, h6) Font family
This section gives option to set font family of paragraph & other content of your site.
Font family for graphs and other stuff

This area allows you to change the font family of all your site's headlines.
Now, click on
Publish button.
How to set up Home Page
Setup Header Section
To proceed with the Header Section,
Go to Appearance >> Customize >> TG Settings >>Header Section
To set up the top bar, follow these steps.
Header Background Color Option:Background colour options for the header section are included.
Header Menu Color and Font Family Option: Color options for the header menu and font family are included.
Menu Text Hover Color Option: Text colour on hover choices are available for header menu text.
Menu DropDown Background Color Option: Includes dropdown menu backdrop colour options.
Menu DropDown Hover Color Option: Color options for the menu dropdown on hover.
Responsive Menu Background Color: Includes responsive menu background colour options.
For Top menu: Create the menu in the dashboard and make it the "Top Menu."
Setup Slider
To configure the slider, follow the steps below.
Go to
Appearance -> Customize -> TG Settings -> Slider Settings
Slider Heading Color and Font Family: It includes colour selections for the heading as well as the font family.
Slider Text Color and Font Family: Text colour options and font family are included.
Slider Image: Set the images for the slider here.
Slide Title: You may change the title on the slider here.
Slide Description: You can add a description to the slider here.
Slider Link: You can add the button link here.
Setup About Us Section
To proceed with the About Us Section,
Go to Appearance -> Customize -> TG Settings -> About Us Section
In this part, you can customise the background image, title, sub-title, and description of your site's about us section. Options are further described in the sections to which they belong:
Setting Options: Section display enable / disable settings are included.
Section Sub Heading Color & Font Family Option: Subheading colour and font family selections for specific section.
Section Text Color & Font Family Option: Contains text colour and font family settings for the specifix section.It is font family selections for the specification section.
Setup Our Classes Section
To proceed with the Our Classes Section,
Go to Appearance >> Customize >> TG Settings>> Our Classes Section
You can customise the images, title, and sub-title of our classes section in this area. It also has the following customization options:
Setting Options: Section display enable / disable settings are included.
Section Title Color and Font Family: There are colour options for the title and font family for the relevant section.
Section Sub Title Color and Font Family: Color options for the sub-title and font family for the specific section are included.
Section Sub Title Color and Font Family: Color options for the sub-title and font family for the specific section are provided.
Background Color Option:Background colour options for specifying section arrangement are included.
Background Image Option: Includes backdrop image options for customising section layout.
Number of Content to show: Allows you to specify the number of photographs to display on a single slider.
Setup Meet Our Trainers Section
You must first install and activate the "WP-Fitness Post Type Plugin." More information regarding this can be found here.
To proceed with the Trainers section,
Go to Appearance >> Customize >> TG Settings >> Trainer Section
You can change the section title and description in this section. Options are further described in the sections to which they belong:
Setting Options: Included are options to enable and disable the Trainers section display.
Section Title Color and Font Family: Color options for the title and font family for the specific section are provided.
Section Paragraph Color and Font Family: Color options for paragraphs and font families for certain sections are provided.
Section Button Text Color and Font Family:Color options for button text and font family for specify section are included.
Background Color Option: Background colour options for specifying section arrangement are included.
Background Image Option: Includes backdrop image options for customising section layout.
Button Link:Allow you to include a link for the Read More Button.
Slider Text Font: This option allows you to change the font of the section's slide text.
To add new trainers, please follow the steps outlined below.
Go to Dashboard >> Our Trainers >> Add New
Once you've added posts to Our Trainers, you can add as many as you want.
Trainers Section Shortcode:
The Trainers Shortcode allows you to contact your trainer section from anywhere on the page simply by inserting the shortcode.
Take a look at the screenshot.
Setup Choose Our Pricing Plans Section
To proceed with the Check Out Pricing Plans section,
Go to Appearance >> Customize >> TG Settings >> Pricing Plans Section.
In this part, you can customise the theme's Title, Service Name, Plan Name, Plan Price, and Content. Options are further described in the sections to which they belong:
Setting Options: Service display enable / disable settings are included.
Section Heading Color and Font Family: Contains colour options for the heading as well as the font family for the specified section.
Section Text Color and Font Family: Color options for text and font family for specific part are provided.
Section Price Color and Font Family: It has colour options for the price and a font family for the specification section.
Section Offer Color and Font Family: Color options for offer and font family for specifix section are included.
Section Button Color and Font Family: Contains color options for buttons and it's font family for specifix section.
Background Color Option: Background colour options for specifying section arrangement are included.
Background Image Option: Includes backdrop image options for customising section layout.
Number of Plans to show: Allow you to decide the number of plans you want to sell and show.
Button Link: Allows you to include a URL for the Sign Up Button.
Success Stories Section
You must first install and activate the "WP-Fitness Post Type Plugin." More information regarding this can be found here.
To proceed with the Success Stories Section,
Go to Appearance >> Customize >> TG Settings >> Success Stories Section.
You can change the title and description in this area. To customise this area, follow the steps below:
Setting Options: Service display enable / disable settings are included.
Section Title Color and Font Family: Color options for the title and font family for the specific section are provided.
Section Paragraph Color and Font Family:Color options for paragraphs and font families for certain sections are provided.
Background Color Option: Background colour options for specifying section arrangement are included.
Background Image Option: Includes backdrop image options for customising section layout.
To display the number of clients on pages, please follow the instructions below:
Go to Dashboard >> Success Stories >> Add New.
To create a Success Stories Section, first add a Title (as the client's name), Description, Image, and its designation utilising the Success Stories Post. To add posts, follow the steps outlined below.
Once you've added posts to the Success Stories, you can add as many as you like, and you're done.
Shortcode for the Success Stories Section:
The Success Stories Shortcode allows you to call your Client section wherever on the page you choose by simply inserting the shortcode.
Take a look at the screenshot.
Setup Gallery Section
To proceed with the Gallery section,
Go to Appearance >> Customize >> TG Settings >> Gallery Section.
Set gallery photographs in this section. If you want to add a gallery using the wp-gallery-plugin, you can also use the gallery's shortcode ("[galleryshow gallery=5 numberofitem=5]") in the customizer. You must first install and activate it. More information regarding this can be found here.To configure this plugin, go here. From here, more customization will take place.
Setting Options: Service display enable / disable settings are included.
Background Color Option: Background colour options for specifying section arrangement are included.
Background Image Option: Includes backdrop image options for customising section layout.
Recent Post Section
To proceed with the Gallery section,
Go to Appearance >> Dashboard >> Post >> Add New
You can create new posts in this section by entering the title, content, and image. From here, more customization will take place.
Go to Appearance >> Dashboard >> Post >> Recent Post Section.
Setting Options: Service display enable / disable settings are included.
Section Title Color and Font Family: Color options for the title and font family for the specific section are provided.
Section Text Color and Font Family:Color options for text and font family for specific part are provided.
Section Paragraph Color and Font Family:Color options for paragraphs and font families for certain sections are provided.
Date Color and Font Family: Color options for the date and font family for the specifix section are included.
Section Button Color and Font Family: It has colour options for buttons as well as a font family for the specifix section.
Background Color Option: Background colour options for specifying section arrangement are included.
Background Image Option:Includes backdrop image options for customising section layout.
Setup Services Section
To proceed with the service section,
Go to Appearance >> Customize >> TG Settings >> Services Section
In this part, you can customise the images and titles of the services offered on your website. Options are further described in the sections to which they belong:
Setting Options: Service display enable / disable settings are included.
Section Title Color and Font Family: Color options for the title and font family for the specific section are provided.
Background Color Option: Background colour options for specifying section arrangement are included.
Background Image Option: Includes backdrop image options for customising section layout.
Number of Services to show: Allow you to choose the number of Services to display.
Setup BMI-Calculator Section
To proceed with the BMI-Calculator section,
Go toAppearance >> Customize >> TG Settings>> BMI Calculator Section
In this section, you may customise your Fitness Image and Title. Options are further described in the sections to which they belong:
Setting Options: Includes options to enable and disable the BMI-Calculator section display.
Section Heading Color and Font Family: Family:Contains colour selections for the heading as well as the font family.
for specifix section.
Section Text Color and Font Family: Color options for text and font family for specific part are provided.
Background Color Option: Background colour options for specifying section arrangement are included.
Background Image Option: Includes backdrop image options for customising section layout.
Section Title:Allows you to provide the title that will be shown.
Setup Contact Us Page
To display the contact page, first select the contact template.
To proceed with the Contact Us Page,
Go to Dashboard >> Contact >> Contact Forms
To view the contact page, first choose a contact template.
After copying a brief code from the contact form, paste it into the customizer.
Through the customizer, you can add Name, E-mail, Contact Number, and Address to this part. It also has the following customization options:
Go to Appearance >> Customize >> Themes Settings >> Contact Us
Setting Options: Included are options to enable and disable the Contact Us section display.
Contact Form Shortcode: Copy a short code from the contact form and paste it into the "Contact Form Shortcode" field.
Section Heading: You can include a heading for the specific section.
Contact Us Tittle Color and Font Family: Color options for the title and font family for the contact area are included.
Contact Us Text Color and Font Family: Color options and font family for the contact section are included.
Latitude and Longitude Option: On Google Maps, you can enter the Latitude and Longitude of your address.
Setup About Us Page
To proceed with the About Us Page,
Go to Dashboard >> Pages >> Add New
You must create a new page for the About Us section. After creating a new page, you can customise its title, description, and image. Image must be added using the "Add Media Option." After you've added a picture, copy the image url and paste it above the description. Put the short code ("[wp-team]") at the bottom of the description to display "our trainer section." Choose the about template to display this page.
Setup Footer Section
To proceed with the Footer section,
Go to Appearance >> Customize >> TG Settings>> Footer Section
In the footer, you have four columns. Each column displays a distinct element. Let's go through each column one by one.
First column: This section's content will be generated by the customizer. You can customise the content using the customizer.
Second column: The admin pannel widget section will be used to configure these areas. Add any widget you like.
Third column: This section's content will be generated by the customizer. You can configure the classes using the customizer.
Fourth column: This section content will come form the customizer. Add the contact form7 plugin to your wordpress account. Activate the plugin and create your own form. Once you have done with this copy it's shortcode and put this( "[contact-form-7 id="124" title="Untitled"]" ) shortcode in the customizer.
Setting Options: Included are options to enable and disable the Contact Us section display.
Section Title Color and Font Family: Color options for the title and font family for the specific section are provided.
Section Text Color and Font Family: Color options for text and font family for specific part are provided.
Background Color Option: Background colour options for specifying section arrangement are included.
Background Image:Image choices for specifying section layout are included.
Number of Services to show:Allow you to choose the number of Services to display.
Setup Copyright Text
To proceed with the Copyright Text,
Go to Appearance >> Customize >> TG Settings>> Copyright Text
In this box, you enter all of the Title and URL. Options are further described here based on the areas to which they relate.
Setting Options: Included are options to enable and disable the Contact Us section display.
Title : Allow you to provide the title that will be shown.
Copyright Text Color and Font Family: Color options for copyright text and font family for specify section are included.
Background Color Option: Background colour options for specifying section arrangement are included.
Background Image Option: Includes backdrop image options for customising section layout.
Plugins
With the use of plugins, you can increase and expand WordPress's existing functionality.
How to activate plugins
If you want these functionalities in your theme for which you need to activate plugin. Follow these instructions to activate plugin in your theme.
Go to Plugins >> Installed Plugins >> WP Fitness Wordpress Theme >>Activate
Once you activate the plugin it will create two register posttype namely:Our Trainers and Success Stories on the Dashboard
Once you enable the plugin, these two sections will appear on your website. A screenshot of the same can be found below.
1. Our Trainers
To exhibit your Trainers post inside the "OUR TRAINERS" area on the homepage, as well as to display on posts and pages via shortcode, you must install and configure this plugin.
Go to Dashboard >> Our Trainers >> Add New Post
Add as many Trainers as you wish.
You may now view your post as a slider on the homepage, and you can also display it on an inside page using a shortcode.
2. Success Stories
Similarly, to display your Success Stories as they appear on the homepage within any post/page, simply follow the steps below.
Go to Dashboard >> Success Stories >> Add New Post
Add a title, description, designation, and featured image to your Success Stories article before hitting the publish button.
This post will then appear on the page where you placed the shortcode.
Child Themes and Hooks
Custom theme editor is a simple method for modifying the site. If you need to add a part to the site, you can easily edit in the child theme and alter it in the parent theme.
Hook code below Slider
Hook code below About Us
Hook code below Our Classes
Hook code below Meet Our Trainer
Hook code below Pricing Plans
Hook code below Success Stories
Hook code below Gallery
Hook code below Recent Post
Hook code below Services
Hook code below BMI Calculator
Hook code below Blog Fullwidth Header
Hook code below Fullwidth Blog Footer
Hook code below Page Header
Hook code below Page Footer
Setup Navigation
First of all create pages from go to Pages >> Add new page.
Go to Appearance >> Menu
Click on Create a new menu link
Give your menu a name in Menu name and save menu button.
Once you've created the menu. You must add pages by selecting them using checkboxes. After you've added a menu list, you can rearrange it using drag and drop.
Choose a menu theme location from the checkboxes below.
For a better understanding, look at this screenshot.
Page Templates and sidebars
Page Templates
Default Template (the standard page design with a right sidebar
)
Page (Left Sidebar) (a page template with a left sidebar
)
Page (Right Sidebar) (a page template with right sidebar position)
Blog (Full Width) (a blog templates with one column without sidebar)
Blog (Left Sidebar) (a blog templates with left sidebar position)
Blog (Right Sidebar) (a blog template with right sidebar position)
Contact Template (the default Contact template with no sidebar position)
Home Page Template (the default home page template with right sidebar position)


.png)


.png)


.png)